A warm welcome to the job costing system user guide. This guide walks you through adding items, creating templates, adding items to a template and creating a job for your reference or customer.
Please note, the naming of items and templates can be changed within the costing system so as to match the naming conventions used within your business. So in the guide that follows an item could be known as a component and a template could be known as a unit.
Contents
1/ Adding items
2/ Creating a template
3/ Deleting a template
4/ Adding items to a template
5/ Creating a job
6/ Deleting a job
7/ Adding items to a job
8/ Deleting items from a job
9/ Deleting a complete assembly of items
10/ Viewing the cost of a job
11/ Calculating sales price based on gross profit
12/ Calculating gross profit based on sales price
13/ Resizing a template
1/ Adding Items
Login to http://cloudapp.objitec.com/ using your user name and password and select items.

Press “+ New” in the top toolbar to create a new item.
Enter the item description for example chipboard
Enter the Item Variant if it has one e.g. Wood Grain
Next, if the item has dimensions enter a description for the dimensions.
So for example chipboard may have Length and Width. Details that you enter here become input fields elsewhere in the system, so in the example below I have specified that each dimension should be entered in millimetres.
Enter an estimate of the waste percentage for the item.
Enter a pricing unit. Chipboard is purchased in metres squared.
Brackets and hinges may be priced per pair or per unit. Edging might be priced per metre, etc.
Then enter your cost for that item.
Finally, the system needs to know what the conversion factor is. So in the example below chipboard has two dimensions measured in millimetres and the pricing unit is metres squared so the conversion factor mm x mm to m2 has been selected.
Please note that the conversion factor drop down selection only appears when you enter dimension descriptions for an item. For items without dimensions specified the conversion factor isn’t a requirement.
Click the blue Add Item button to add your item to the database.

After clicking the Add Item button you will notice that a new tab ‘Costs’ appears.
Clicking this tab lets you manage the costs of an item. Click on the row to update the cost. Click on ‘Add Cost’ to add a new cost. The system records one cost per day

Updating a cost…

I’ve gone ahead and added some more items, just enough to be able to make the example that follows meaningful.
If you are actively following this example yourself then please go ahead and add these items into your system now or alternatively add items that are more relevant to your particular business.
You can see the items that I added below…

2/ Creating a Template
A template is a collection of items. Name templates after products you manufacture or services that you offer. Add items to the template that are used in the manufacture or delivery of that product or service.
Templates are created to save you time later on when creating a job for a customer. They enable you to add a group of items in one go related to a particular product or service that your customer has requested.
To create a new template, you can either select + new and then template from the main navigation menu…

Or you can click on the templates button…

And then click + New from the main navigation menu.
The template properties form will display…

In the example above I am creating a template for a Standard Kitchen Unit with height, width and depth dimensions of 720 x 1000 x 560 millimetres.
Click on the Save changes button and the system will return you to a list of all of the templates that you have set up. In our case this is just one…

3/ Deleting a Template
You may notice a small blue x next to your template description. This is because the template currently has no items associated with it and therefore you can delete the template if you wish.
To delete the template, click on the blue x and then click OK on the message “This template will be removed.”
Only templates containing no items can be deleted. The blue x delete symbol will not be displayed if a template has items contained within it.

In this situation, I’m not going to delete the template so I will click cancel.
Instead click elsewhere on the row of the template to update the template we have just created.
This will take you back into the template properties form where if you wanted to you could update the template description and / or the template dimensions.
However, you will also notice a new tab labelled items…

Click on the items tab to display the add item to template form.

4/ Adding Items to a Template
To add an Item to a template, click the green ‘Add Item’ button. The system will display the following Add Item to Template form.

This is a dynamic form and what is meant by that is that it changes depending on which kind of items you add to it.
If you enter an item without any dimensions, then the form stays as is.
So for example lets add two silent close hinges.
Start typing hinge in the Item field. Providing you entered a hinge as an item earlier you will see a drop-down with the hinge appear below the field. Select the hinge and then enter the quantity you’d like, which in this case is 2…

Next we are going to select an item that has dimensions. Enter the chipboard that we entered earlier and the form will now dynamically alter.
The dimension fields that we entered when we created the chipboard item (Length (in mm) and Width (in mm)) will appear on the form.
In the example that follows we are going to add two end panels of a kitchen unit made out of chipboard.
So first we begin typing chipboard in the item text box. Next we select our chipboard item. The description text box automatically defaults to the name of the item, however in this case we’re going to change the name to an ‘End’ so that we are clear that this chipboard is going to be used to make the end panels of our unit.
There are 2 end panels on a kitchen unit so next I enter a quantity of 2.
When chipboard is purchased it has a length and a width. The system needs to know how the length and width maps to an end panel. End panels have a height and a depth. So in this case in the two ‘Linked To’ drop down boxes I have selected ‘Height’ to be linked to ‘Length’ and ‘Depth’ to be linked to ‘Width’. I have also entered the Height (Length) of each panel as being 719.5 and the Depth (Width) of each panel as being 569.5.
This mapping of dimensions is required so that the system can calculate costs of items that are identical in every way except for their dimensions. For example, you may want to create an identical unit but instead of it having a width of 1000mm you require a width of 900mm.
Next I enter any linked (or child) components. So in the case of 2 chipboard end panels you would want to add some edging tape. So I add one strip of Melamine edging to the Length (which is the Height of the end panel). I add 2 strips of Melamine edging to the Width (which is the depth of the end panel) and then I have added 1 strip of ABS edging to the other Length (which is the height of the end panel)
Finally, all is complete so I click Ok.

Next we are going to add more items to the same template.
Chipboard used as the bottom of the unit…

Chipboard used as the back of the unit…

A shelf…

And a rail…

Finally, we’re going to add some more components that don’t have dimensions. This is by no means a complete set of components required for a kitchen unit, but it’s enough for the purpose of this example.
- We’re going to additionally add…
- Wood dowels
- Caution labels
- Packaging
- Screws
- And assembly instructions
Our standard kitchen template now contains the following items…

Please note items that are listed in blue are items that additionally have linked components such as edging.
5/ Creating a Job
Before creating a new job please ensure that you have your customers set up in the system. To learn how to set up customers please refer to the customer database user guide.
Once you have your customers set up, begin by pressing the blue Jobs button…
Press “+ New” in the top toolbar to create a new job.
Next begin typing in your customer. As you type, customers that match the text that you enter will display below. Select the appropriate customer and then the system will automatically populate that customers address and contact details below. See the example below…

Next optionally add a reference for the job.
Then add a job description. Job description is a required field so you will not be able to save your job until this has been entered. In this example we’re going to cost a Standard Kitchen Unit and therefore I have entered ‘Standard Kitchen Unit’ into the Job Description field.
Required date defaults to today but you have the option to change it to any date you want.
Also Job Status defaults to ‘Not Started’
We will discuss Costs, Sales Price and Gross Profit later so for now click the blue ‘Save changes’ button to save your job.
This will return you to a screen displaying a list of all your jobs…

6/ Deleting a Job
On the job list screen above you will notice a blue x next to the job description. This x means that the job can be deleted. Only jobs with no items in them can be deleted.
No blue x will be displayed next to jobs that have items associated with them.
Clicking the blue x will present you with a ‘This job will be removed’ message…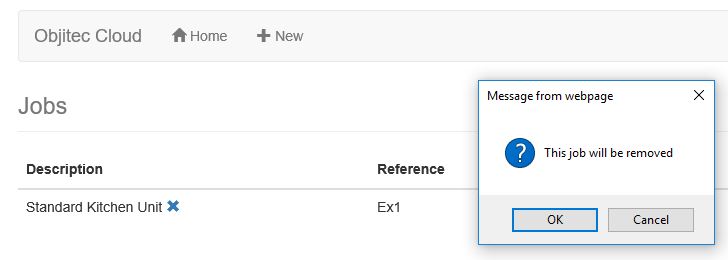
Click OK to remove the Job. In this example we’re going to continue with the job, so just click cancel to keep the job.
7/ Adding Items to a Job
To add items to a job click on the job. This will open back up the job details form, however this time you should notice an additional items tab at the top of the form.

Click on the items tab to open it. Here you will notice two buttons ‘Add Item’ and ‘Add Template’.
The template that we created earlier in this tutorial was created to save us time at this stage. Templates (or units depending on your naming conventions) are collections of items.
As we don’t want to add every individual item (component) associated with this job we are going to click the ‘Add Template’ button. Clicking this button opens a pop-up-form to enable you to select one of the templates that you have created.
In the example that follows I select the Standard Kitchen Unit template that we created earlier. I then enter an Assembly name of Standard Kitchen Unit 1000mm. This is to make it clear that we are creating a job containing a Standard Kitchen Unit that has a width of 1000 millimetres.
For this example I’m just going to add one of them to the job so I enter a quantity of 1 and I am going to keep the standard unit dimensions of 720, 1000 and 560. The graphic below demonstrates…

After you click the add button you will be returned to the items tab of the job form and you will see the assembly that you have just added.
Clicking the [+] sign to the left of the assembly will enable you to drill down into the details of that assembly i.e. it will display all of the items contained within the assembly…

Now we have added this assembly to the job we can go ahead and add further assembles by clicking the ‘Add Template’ button and repeating the process.
Next lets add two additional items to this assembly. First we will add an item with no dimensions such as packaging and then we will add some chipboard as that has dimensions.
To do this you would click the ‘Add Item’ button. The ‘Add Item To Job’ pop-up-form will display.
Adding another set of packaging to the assembly…

Adding additional chipboard to the Assembly. Here you will notice that additional dimension fields appear on the ‘Add Item To Job’ form as the system needs to know the dimensions of the chipboard that you are adding…

8/ Deleting Items from a Job
To delete an individual item from a job. Open up the items tab of the job properties and click on the [+] to exapnd the assembly.
Next click the blue X next to the item that you want to delete. Read the pop-up warning message that displays and the click the blue delete button.
I deleted the additional chipboard that we added earlier and then in the example below I delete the additional packaging also…

9/ Deleting a Complete Assembly of Items
To delete a complete assembly of items click on the red X to the right of the assembly name. Read the pop-up warning message and then click the red delete button. If you are following on with this example then don’t actually delete the assembly. I delete it in the example below, however I re-added it straight after for the purpose of continuing with the example.

10/ Viewing the Cost of the Job
To view the calculated cost of the job click on the job tab and scroll down to the costs. The system has calculated a total cost for the job of £19.25 with £2.07 of that being wastage.
Sales Price and Gross Profit for now default to zero.

11/ Calculating Sales Price Based on Gross Profit
Next we are going to work with the actual costings of this job and calculate a sales price based on the gross profit that we want to achieve.
Click on the job tab.
Scroll down to the gross profit field. Enter the gross profit and the sales price will be calculated. In the example below I entered a gross profit of 45% and the system calculates a sales price of £27.91

12/ Calculating Gross Profit Based on Sales Price
The system also enables you to do the calculation the other way round if you prefer. To calculate gross profit based on sales price ensure you are on the job tab and scroll down to the Sales Price field.
Check that both the Gross Profit and Sales Price fields are set to zero. If they’re not then you can manually set them to zero yourself.
In the Sale Price field enter the price you would like for the job. The system will automatically calculate the Gross Profit for you. So in the example below I have entered a Sales Price of £29.99 and the system has calculated that this will give us a Gross Profit of 55.79%

13/ Resizing a Template
The costs of a template or unit can be adjusted by resizing dimensions. The system automatically recalculates costs based on any dimension changes that you make.
So for example your standard kitchen unit is 1000mm wide, but you also want to price up a unit which is made up of identical items (components) but has a reduced width of 900mm.
The example below shows how to do that.
First I have created a new job called “kitchen unit 900mm”.

Click on the newly created job and go to the Items tab and then click on the Add Template button. The system displays the Add Template pop-up form.
Here we can select the Standard Kitchen Unit that we have used before. However, this time change the name of the assembly to “Kitchen Unit 900mm”.
Enter a quantity of 1.
And then change the width of the unit from 1000mm to 900mm. Then click the blue Add button.

We now have a kitchen unit with a width of 900mm added to our job. All of the dimensional components such as chipboard and edging have been resized and their costs recalculated automatically.
You can see the costs and wastage by clicking back on the job tab.
In the example below a gross profit percentage of 45% has been added.
